Wednesday, April 22, 2020

Time to Sew Again 2020

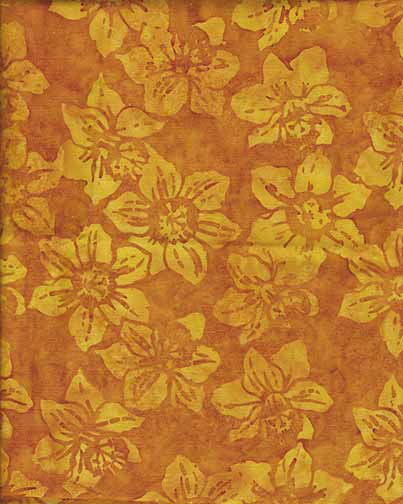
My 2-sprig textile design
from part of a copper batik stamp


I am cleaning up my sewing room, and organizing the fabrics I have on hand for the top 20 or so projects I have in mind. (Of which if I get 2 or 3 made, I'll be very happy.) I want to alter/make a couple of patterns, for a linen tank top to replace the one I used for sleeping for many years. And a linen princess-line tunic to go with my favorite multi-color long skirt, which I plan to embellish with card-weaving (time to get back to doing that too) along the seams. And from that a pattern for linen tunics/dresses with a bodice panel from one of my textile design fabrics. Maybe a Viking costume with card-weaving. . .

I have plenty of fabric on hand, linen and my (and Amy Vail's) textiles, a few pre-washed, for the first few projects. Time to get a washing machine again, once it is possible. Linens are beautiful, soft and strong, but definitely need to be pre-washed several times.

Here's another of the Empire/Regency inspired clothing designs I did several years ago for a Costume History/Fashion History class, using textile designs I did for the project.

Empire-inspired dress design
using my textile designs

It will be fun to get back to doing one of my favorite things. Maybe roses next. . .

Labels: , , , , , , , , , , , , , , , ,

Monday, May 09, 2016

Workaround again - for Minoan Textiles

http://www.spoonflower.com/designs/5683117-minoan-favorite-textile-design-ewbarber-2-batiktextures-trueblue-cherryred-forestgreen-white-by-mina
Real Minoan fabric design, 1500 BCE approx, as shown by Elizabeth Wayland Barber, from Egyptian frescos.

I need to add a powerpoint presentation to the discussion board for a class I'm taking. This was the workaround for doing images that I used before, but now I know how to do that. Only that way only works for image or video files. Most of the other students have used a link.

So, we'll try. This is the topic I have been totally absorbed by lately. (Well, roses too...)

Minoans, specifically their clothing.

(where did that come from? Well, I have always been interested in costume history. And an Art History class last semester.)

This textile design is derived from one that Elizabeth Wayland Barber shows in her wonderful books, as being a favorite exported by the Minoans to Egypt. (1500 BCE or so?)
No, this won't work to share a powerpoint for my class, but I can share this fabric design. Soon it and other Minoan designs may be up at Spoonflower.

It is up on Spoonflower, and there are other Minoan-inspired fabrics there too now. Not available yet for sale, except a blue-grey one.

smaller Minoan-inspired design from the Snake Goddess' bodice

Of course I did make a colorful one too. 

To see what these designs are inspired by, check my Pinterest board.   https://www.pinterest.com/minawagner/minoan-clothing-fabrics-approx-2500-1200bce/

The green in the first design is definitely not Minoan. I have just been rereading the chapter from Elizabeth Wayland Barber's book Prehistoric Textiles, reprinted in Woven Threads, a book about evidence about Aegean textiles. And in the ancient Egyptian depictions of Minoan textiles, they are just red, white, and blue. But these are a couple of their favorite patterns.
 

Labels: , , , , , , ,

Wednesday, October 21, 2015

All the Cats Are Outside Hunting Moths and Won't Come In to Supper Sept 2015

AllTheCatsAreOutsideHuntingMoths&Won'tComeInToSupper 
Happy Kitten Day - late. The kittens birthday is September 7th; I made this new fabric design on September 10, 2015. I just got it proofed, edited, re-tested, and put up for sale today, Oct. 21.

Learned 2 things in the process. The first is that Spoonflower's new fabric-printing system is indeed brighter, and I'll want to get this printed on one of those fabrics. (The synthetics also print bright colors.) And the second is that with these textured backgrounds and fills (done from Photoshop patterns), it is important to print them full-size to be at their brightest. Otherwise, just like a small print seen from a distance, they go greyer.

I think I might be going to use this fabric, or one of its coordinates, for a fleece-lined open vest this fall.

The happy kittens (5 years old now) are all happy and healthy. They spend some days out on the balcony and low roofs with the roses, but when I'm gone to classes, I get home too late, and it's getting cool and dark already before I could let them in.

Labels: , , , , ,

Friday, September 19, 2014

More Nomad Dress Ideas (Folkwear#107)

Batik-look version of the Nomad Dress

This mock-up version of the Folkwear #107 Afghani Nomad Dress is made from some of my virtual-batik fabric designs at Spoonflower, a print-on-demand fabric designers' site. Although I have tested these 2 designs shown, the Arts and Crafts Deer and Grapes design, and the 2-Sprig design, the deer in quite a few colors, I have not yet made them in the same color, as shown here. This color prints as a deep rich Aquamarine.

 Love Explosion fabrics version of Nomad dress Folkwear#107

This is a more brightly-colored and multi-fabric mock-up, using some of my computer drawn quilting fabric designs. Of these, the hearts and the maple leaves are available, but the Love Explosion and this new color of my 2-Papercuts design I have not yet tried out. But this gives an idea how combining brighter colors would look. The hearts as shown here is a larger version than I tested, I think, but these vector designs can be made any size.

Soon I'll be ready to show the fabrics I'm working on now, derived from the copper batik stamps I just got, and others, which I am making into virtual embroideries instead of virtual batiks, and with textured backgrounds.

Labels: , , , , , , , , , , , , ,

Tuesday, September 09, 2014

Nomad dress ideas

Folkwear #107 Afghani Nomad Dress pattern, using my ideas for Spoonflower "cross-stitch embroidery" fabric designs
 I am thinking of making a Nomad dress from Folkwear pattern #107. Seems like I have always wanted one. But somehow I never noticed this pattern. And here this style is, coming around again.

Back in the day, I would have embroidered  the bodice myself. Today, I am using some of my cross-stitch designs from the '80s to make Spoonflower fabric which I can have printed, and use for parts of the dress.

I'll probably use either fabrics I dye, or lightweight cotton batiks, or both, for most of the dress. Fabric from Spoonflower comes in many weights, but the cross-stitch patterns look best on the linen-cotton canvas, which is heavier than I would use for the whole dress.

To do this version, I need to put those cross-stitch designs on different background colors - I'm thinking of a deep, rich aquamarine which I just tested as a virtual batik. Once I've bought some of the new colors, they will be available for sale too.

Here's a different version, using some of my Decorator Collection coordinates. The bodice and sleeve prints are available for sale now. This one shows the waistband that the pattern has. These vector-drawing patterns can be any size; I'll have to test appropriate sizes for this dress.

Folkwear #107 Nomad dress pattern, another idea using my Decorator collection fabrics at Spoonflower
Sept. 9, 2014 New tjaps today! I captured a couple of my top choices. New virtual embroideries this time, instead of (or in addition to) virtual batiks. Coming soon, with luck. And this time, no chance for the mail carrier to deliver the package to the garbage can so it vanishes!

Labels: , , , , , , , , , ,

Tuesday, June 03, 2014

Empire Inspired Dress Design with my Fabric

Empire-waist dress in Regency Stripe fabric, dark bluegreen

Regency-inspired dresses and fabrics April 2014 (written 4/16/2014)

This spring I was taking a costume history (fashion history) class. And one assignment we had was to design some modern clothing inspired by a historical period.

In the days when I was an active Society for Creative Anachronism member, I designed, drew patterns for, and made 12th century and Renaissance clothes for myself. But for this assignment, I decided to do Empire/Regency inspired designs, since I knew from my long-ago experience that those dresses, if cut right, could be flattering. If not, like the granny dress revival from the 60s, they can look like a sack of potatos tied with a string.

The secret, also mostly not apparently known by the designers of recent empire-waist tops, is that they have to flare from that high waist, not be cut straight.

The fun thing about doing this type of assignment today is the great research possibilities for the historical references. Even the current costume books may have larger color pictures, compared to 20th century ones. But of course, the internet sources are the great difference.

Turns out there are thriving Regency/Jane Austen communities out there, including commercial patterns drawn to re-create real period designs, which have to be worn over period underthings or they won't fit. (No wonder some of the period paintings and drawings, like some by Ingres, don't look right in their proportions. Their stays pushed the bust way, way up.)

But of course, I was doing modern clothes designs, in fact, things I might want to wear myself. And, since my clothes designing has always been fabric-driven, and since textile design is now my passion, first I had to design the fabrics...

Besides some overall prints, I wanted some border prints which might look like embroidery patterns. And I will be making engineered versions which can be placed around curved, flared hems and necklines, as well as straight for on sleeves.

This stripe is not like any period fabric, although maybe it has a little rococo flavor. But I like it on this dress. I designed it smaller, but liked the effect when I stretched it larger to put on the drawing, so I made a larger version of the fabric too. There's a link on the picture to one of the fabric pages at Spoonflower. I will be making one even taller too, and soon this large-scale darker one with a textured background will be available.


**Other versions coming, including border prints which look fairly in period, one based on a vintage copper batik stamp.

And, I'm working on some fabrics to recreate the big surprise I found in my research - shawl dresses in rich colors with deep borders, made from imported Kashmir shawls, or the European copies made in merino wool. Josephine had several. They weren't always wearing those drafty transparent white muslins...

Labels: , , , , , , , , , , , , , , ,

Friday, April 05, 2013

Catching up 2

This textured, no longer photographic, image should make fun fabric, maybe for curtains or cushions. I'll be getting a swatch from Spoonflower to see how it comes out.

I had forgotten what it is like to work retail during the holiday season, and didn't get any entries posted here for a long time, but I was still taking pictures and thinking of things to write about. I am going to add a list here as I add backdated posts.


Post date: 2-22-2009 Post: OK Kelvin, if these aren't interference patterns, what are they? 4-29-09
Reposted into 2018, Feb 6.

Labels: , , ,

Monday, September 29, 2008

How to make gingko leaf fabric


First you catch your gingko tree. That is, now, while the leaves are on the trees, go around looking for one. If you don't have one in your neighborhood, nor room to plant one (or none at the local nurseries), try a nearby college campus. They often have them.

(I actually bought a gingko tree for this and Precious Metal Clay jewelry, with a rootstock that had different shaped leaves from the top, so I have 2 shapes to use.)

You're going to want to collect the leaves to make your real fabric in the early fall, when they're freshly-fallen and still soft. But it should be ok to pick enough leaves to do a few fat-quarter color samples like this one. They're easiest to use while fresh, pliable and strong. If it's going to be a day or two, press them to keep them flat.

I suggest doing your tests on cotton fabric, ready-to-dye or prepared-for-dyeing. Your local fabric store may have some, or your favorite internet fabric store. If not, try the fabrics at dharmatrading.com. Use Procion MX dye with cotton, linen, or rayon fabric.

You may find a color you like straight out of the jar; I prefer mixed colors, and mixed from mixed colors themselves, not from the clear primaries, which to my eyes give bland bright colors. So you will want to experiment with colors too, separate from the leaves. I suggest using 2 colors only, choosing some near each other on the color wheel, which will blend harmoniously, unless you have favorite dye colors already.

The easiest and most direct way to do this will be to fix the dyes with a paint-on fixative, like Afterfix from Dharma Trading. The alternative is to batch-fix the dye, which involves covering the dyed fabric with plastic to keep it moist for 24 hours. Either way this is best done in warm, even muggy weather. The only thing about the Afterfix method is that it is harder to do on long pieces of fabric. (It's great on fat quarters & half-yards.) You may want to work with 2-yard pieces max, and do more than one if you need more.

Supplies for dyeing;

Procion MX powdered dye (or liquid), 1 or 2 colors, and instructions from your dye supplier for tub dyeing and dye-painting
Plain salt (not iodized) from the grocery store
Warm water (tap water)

Afterfix paint-on fixative (from dharmatrading.com)
OR soda ash for batch-fixing,
AND soda ash for immersion dyes for coordinating fabrics.

Spray adhesive, especially a kind which can be removable if sprayed lightly. Test.

Cotton, linen or viscose rayon fabric, ready to dye. Prewashing and drying before use is a good idea. If you are going to batch-fix, presoak in the soda-ash solution, let drip dry before use.

Helpful: Synthrapol detergent, for washing out dye, and Reduran for cleaning hands.

Tools for dyeing and dye-painting:

Dust-mist mask for mixing dye-stock solutions (and soda ash solutions)
Measuring cups and spoons (not to be reused for food), and old milk or water jugs with lids, and cups or jars to mix dye-stock in (disposable), plus disposable plastic spoons for mixing. (You don't have to throw these away each time, usually they clean easily.)

Rubber gloves, especially for putting fabric into immersion dye baths.

1 to 2 very fine mist sprayers - pump-types work well. From a dye supplier, or maybe hardware store.

2 sawhorses, with scrap fabric strips, pushpins or staples, and sewing pins, or other method to stretch fabric outdoors, or a clean grassy (or concrete) place to lay out the fabric

Instructions for leaf-dyeing

Read some dyeing instructions first. Dyes are mixed at different concentrations, depending on the density of different colors. Your dye supplier should be able to tell you.

Wear old clothes that you don't mind getting dye spots on. Maybe an apron too.

1) First, lightly spray adhesive on the back of each leaf, and attach them to the fabric in a pleasing pattern. Work on a hard surface, so you can rub them down.

Attach fabric scrap strips to sawhorses with staples or pushpins. Attach your fabric to these strips with sewing pins, or lay fabric out on grass.

2) Mix a scant teaspoon of plain salt into 2 cups of warm water. You will mix your dye-stock solutions from this. The salt gives you a longer working time before the dye bonds to the water and won't dye your fabric.

3) Put on your dust-mist mask while you mix the dye. Close the jar after measuring out dye, and wipe down surfaces with a damp paper towel. Rinse utensils after use. (Use a damp paper towel, or damp paper towel in a plastic dish, to mix on - that way you see any spilled dye.)

For each color, mix 1 to 2 teaspoons of dye into 1 cup of the salt stock solution. Fuschia-based colors are strong; use 1/2 to one teaspoon. Turquoise-based colors are weaker; use 2 teaspoons for a equivalent strength. Like making gravy, start with only a little water, making a paste with the dye in a mixing cup, then adding more water gradually. If some spots of color don't dissolve easily (some reds and golds and grays, I've found) you might filter the solution through a disposable coffee filter.

For darker colors, use more dye, and spray more times.

Put some of each color into a sprayer. Don't breathe the spray! If you are working outside, and spraying away from yourself, that may be fine. Or wear your mask.

4) Your fabric should be laid on the grass, or stretched between sawhorses, with leaves attached, leaf side up.

The important part of spraying the dye is to spray each color lightly several times. Do not saturate the fabric. If the fabric gets too wet, the dye will run under the leaves. Too few passes with the sprayer will leave the fabric looking dotted. Don't let the sprayer drip on the fabric. (Try to hold it off the edge and spray onto the fabric, walking around the stretched fabric to get all areas. Or keep a paper towel under the sprayer to catch drips. Test first! Find a sprayer that doesn't drip.) Test this whole technique before trying your real fabric.

( 5) If you have dye stock left, mix up 2 or 3 gallons of soda ash and salt solution, pour into a large white bucket, and add 1 or 2 colors of dye. Scrunch another piece of fabric to fit, and wearing rubber gloves, push it down into the bucket under the liquid. Leave for 3 to 24 or more hours (turquoise-based colors for 24 hours minimum). This immersion dyeing will make rich colors to coordinate with your leaf fabric.

Or use a large ziploc freezer bag, and 1/2 to 1 gallon solution. This will hold a t-shirt, or some fabric. Less mess. )

6) Let the dye dry completely, maybe 24 hours. Leaves are still on the fabric. If you used sawhorses, take the fabric off and lay it out on the grass. Paint on the Afterfix, leave on for 1 hour, then rinse off. Take leaves off, thoroughly rinse fabric in warm water (Synthrapol detergent is helpful), then wash out.

OR after spraying the dye, in warm muggy weather, cover with plastic to keep warm and moist for 24 hours. This is less useful for this spray technique, where the fabric should dry between spray coats. It is useful for dye-painting on cotton.

©MinaWagner2008 You may print a copy of these instructions for your personal use. Please do not print more copies, or use this as the basis of a class, without contacting me.

Labels: , , , , ,

Sunday, June 10, 2007

Kaleidoscope Night Sky


This is my coloring of a classic quilt pattern called Kaleidoscope. I designed something similar some years ago, but never made it. I didn't mean to stay up so late last night drawing it in Illustrator, but it took a long time to figure out how to recreate this effect; the coloring is not at all the classic one. I wanted to get an illusion of depth, and of light shining through the surface, and I think this succeeds. Half-close your eyes to see the light and dark pattern better.

When I first designed this (with colored pencils and markers on graph paper), part of what stopped me from making it was the potential difficulty of finding the fabrics with the color gradients needed to get the effects of depth and light. Traditional fabric printing doesn't do gradients very well. I wasn't dyeing yet. Now I could dye or dye-paint a gradient that could do those patches. And since I used my favorite colors, these are ones I have worked out how to dye.

I could have found a black with white stars fabric, probably. In this version, those tiny stars are 5 and 6 points, and they have colored edges. I'd never find a fabric like that, though now I could dye-paint a black and white batik with faint star colors.

There are at least 3 sizes of circles in this design that can be brought out by the coloring; this version shows the mid-size one. Although I have used colors halfway between the blue and blue-green, and the blue and purple, in those overlapping circles, it just looks right, not as if the colors are a transparent overlap, which I thought it might. (By the way, there's one gradient direction error in the picture - do you see it? I never have to worry about the hubris of trying to rival the gods with perfection, since I always make errors. And no need to put in a deliberate error either, like the Amish.)

Now in the comments at Dressaday on the June 6 Black and Pink stripes post, Jasmin told us about digital textile printing for fabrics. This is a similar process to printing on treated fabrics with your inkjet, and fixing the prints (supplies at dharmatrading.com) which I've done. But unless you have a very large printer, that's only for 8.5x11 inches pieces. These new technologies are becoming available for custom printing even for small yardages, if you have digital images in the right formats. And they do millions of colors beautifully, so gradients will work.

So I could have printed enough for a bedspread or wall-hanging, or a designer dress! Or sell the design to a digital printer who wants to make commercial yardage. At a minimum I'm going to upload a high-resolution version to my Cafepress store, WRW Color by Design and put it on a throw pillow with black borders, since I'd love to have one of them. And maybe a black tee-shirt…

Labels: , , , , , ,

Saturday, November 18, 2006

That doesn't look like banana bread


But it's just as delicious. It's another gorgeous batik fabric design. Not my color, but beautifully designed. It's one of a small but growing group of fabrics called "If I were going to do a clothing line, these are the type of fabrics I'd use".

The banana bread reference is because I didn't have a picture of banana bread (and wasn't about to not have a hot-out-of-the-oven taste in order to set up a photo). So this fabric is at least golden brown, and reminiscent of banana bread. And the real title of this post is I baked the first banana bread of the year today, hooray

"What", you say, "is the big deal about that? You can bake banana bread at any time." Well, not this kind. This is my very special, extremely tasty cranberry banana bread. It's also one of the few endeavors known to woman which are improved by procrastination…

It turns out that it's very important to the flavor that the bananas be very ripe, over-ripe, even somewhat brown. So if I have three bananas getting pretty ripe, and I save them for baking, waiting a few days doesn't hurt. The other things that make this bread more tasty than the standard are that half of the sugar is brown sugar, half of the flour is unbleached white and the other half is stone-ground whole wheat. Another time I'll tell the stories about how I know the types of flour taste different.

The cranberries are fresh cranberries, sorted very carefully so they are all hard and perfect with no soft spots. The bread is especially good the first day, while there is still a contrast between the tartness of the cranberries and the sweet banana bread. After the second day, the sweetness has osmosed into the cranberries. It's still good, but doesn't have the contrast.

Mina's Cranberry-Banana Bread

mash together:
3 very ripe bananas
1/2 c brown sugar
1/2 c white sugar

stir in:
1 egg

premix & stir in
3/4 c stone-ground whole wheat flour
3/4 c unbleached white flour
1 t baking soda
1 t salt (scant teaspoon)

stir in gently:
1 c very carefully sorted hard perfect fresh cranberries, washed

Pour into a buttered loaf pan. (I use the glass type.) Bake approximately 1 hour at 325℉, until top is golden brown & toothpick comes out clean. If top is getting too dark, cover with foil for the last 15 minutes.

It is especially good hot with butter, or toasted for breakfast. (You might have noticed that there is no butter in it. That's correct. I used to put in melted butter, but then one day I forgot it while it was cooling a little, and left it out. I couldn't detect any difference in taste or texture, and the bananas keep the bread moist, so I haven't used it since.)

Try it out and let me know what you think.

Labels: , , ,

Tuesday, November 14, 2006

Fabric Design Inspirations 1


This is a batik fabric which may still be currently available, by Princess Mirah. The colors are interesting and unusual, though, typically, there are more similar combinations available right now. I'd certainly want to find any necessary coordinating fabrics now. I've just been trying to find "go with" fabrics for my stash, to make some lined-reversible dresses and skirts and wrap tops, and it's almost impossible to find any thing to work with fabrics from years ago. It's not just that the fashionable colors are different, the types of colors, the total palettes, are incompatible. Blued colors from one year, with a red cast from another. And worst, some years the colors are really grayed, some really bright, and they swear at each other. That is, they bring out the worst in each other.

But that's beside the point of what I wanted to say about this fabric, which is to point out the clever design. The use of both positive and negative as design elements especially. I mean the way some of the flower shapes are in the pattern color, and some in the background (whichever that is). This is an idea I want to remember.

Labels: ,